Securing your frontend application with a login and managing a user pool is something you can either write for yourself or use an external identity provider for. If you want to move fast with your prototype you usually pick the second option and search for an OpenID Connect (OIDC) and OAuth2 compliant identity provider. AWS offers its own solution for this: AWS Cognito. With this blog post, I’ll guide you through every required step to configure AWS Cognito for your Spring Boot application using Spring Security to secure a Thymeleaf application with an OAuth2 login.
UPDATE: There is now the second part of this article available which covers the OIDC logout.
Spring Boot setup with Thymeleaf and Spring Security
The demo application uses Maven, Java 11, and Spring Boot 2.3.0. Besides the Spring Boot Starters for Web and Thymeleaf, we need the starters for Spring Security and OAuth2 Client:
|
1 2 3 4 5 6 7 8 9 10 11 12 13 14 15 16 17 18 19 20 21 22 23 24 25 26 27 28 29 30 31 32 33 34 35 36 37 38 39 40 41 42 43 44 45 46 47 48 49 50 51 52 53 54 55 56 57 58 59 |
<?xml version="1.0" encoding="UTF-8"?> <project xmlns:xsi="http://www.w3.org/2001/XMLSchema-instance" xmlns="http://maven.apache.org/POM/4.0.0" xsi:schemaLocation="http://maven.apache.org/POM/4.0.0 https://maven.apache.org/xsd/maven-4.0.0.xsd"> <modelVersion>4.0.0</modelVersion> <parent> <groupId>org.springframework.boot</groupId> <artifactId>spring-boot-starter-parent</artifactId> <version>2.3.0.RELEASE</version> <relativePath/> <!-- lookup parent from repository --> </parent> <groupId>de.rieckpil.blog</groupId> <artifactId>spring-security-aws-cognito-thymeleaf</artifactId> <version>0.0.1-SNAPSHOT</version> <name>spring-security-aws-cognito-thymeleaf</name> <description>Demo project using AWS Cognito with Spring Security</description> <properties> <java.version>11</java.version> </properties> <dependencies> <dependency> <groupId>org.springframework.boot</groupId> <artifactId>spring-boot-starter-web</artifactId> </dependency> <dependency> <groupId>org.springframework.boot</groupId> <artifactId>spring-boot-starter-thymeleaf</artifactId> </dependency> <dependency> <groupId>org.springframework.boot</groupId> <artifactId>spring-boot-starter-security</artifactId> </dependency> <dependency> <groupId>org.springframework.boot</groupId> <artifactId>spring-boot-starter-oauth2-client</artifactId> </dependency> <dependency> <groupId>org.thymeleaf.extras</groupId> <artifactId>thymeleaf-extras-springsecurity5</artifactId> </dependency> <!-- Spring Boot Starter Test and Spring Security Test --> </dependencies> <build> <plugins> <plugin> <groupId>org.springframework.boot</groupId> <artifactId>spring-boot-maven-plugin</artifactId> </plugin> </plugins> </build> </project> |
The application exposes one view where users can log in using OAuth2 (OIDC to be more specific) and AWS Cognito to see messages based on their authentication:

… and if a user logs in:

Required AWS Cognito set up in the AWS console
Setting up AWS Cognito for this OAuth2 login with Spring Security requires some configuration steps in the AWS console.
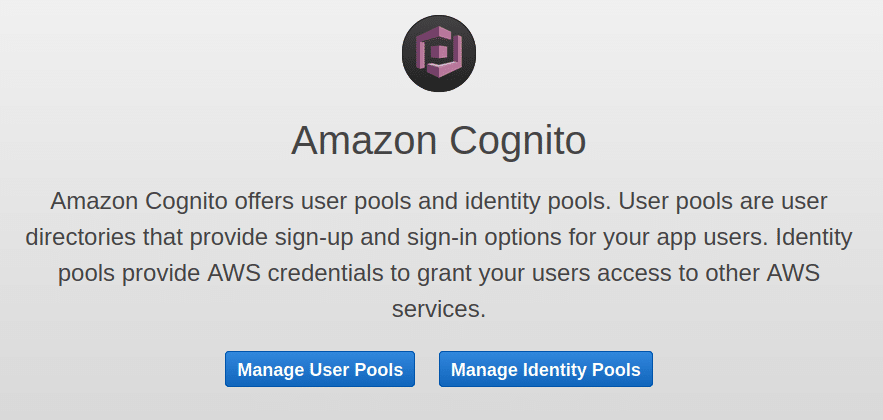
First, log in to your AWS account and search for the AWS Cognito service:

Ensure you are in the correct AWS region you want to create the service for (I’m using eu-central-1). Next, click on Manage User Pools and create a new one:

You can give it any name you want. Continuing with Review defaults is enough for this user pool creation.
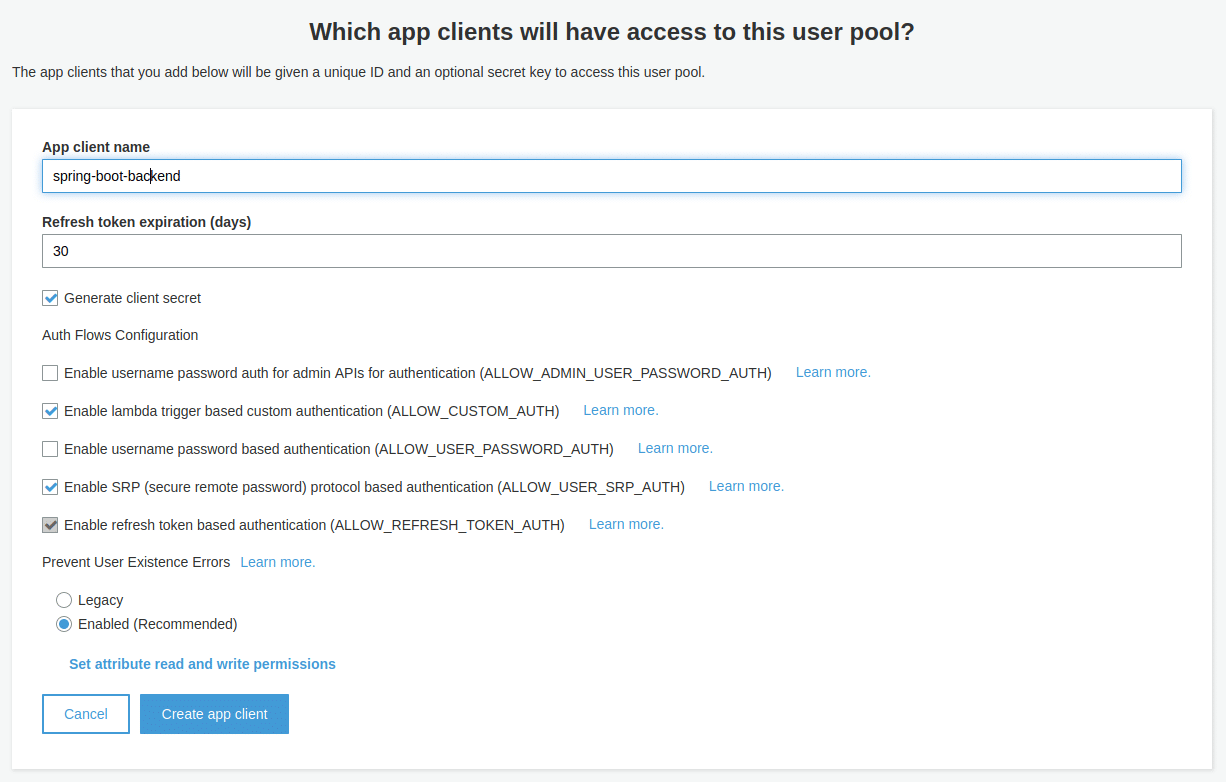
Once you created the user pools with the defaults, you can add app clients (left side menu: General Settings -> App Clients). Our Spring Boot application will act as a client. Therefore configure the client like the following:

The pre-selected configuration for the app client is fine. Just ensure you add the app client name. Once you created the client, store the client id and client secret somewhere e.g. as an environment variable (we need this later on for Spring Security).
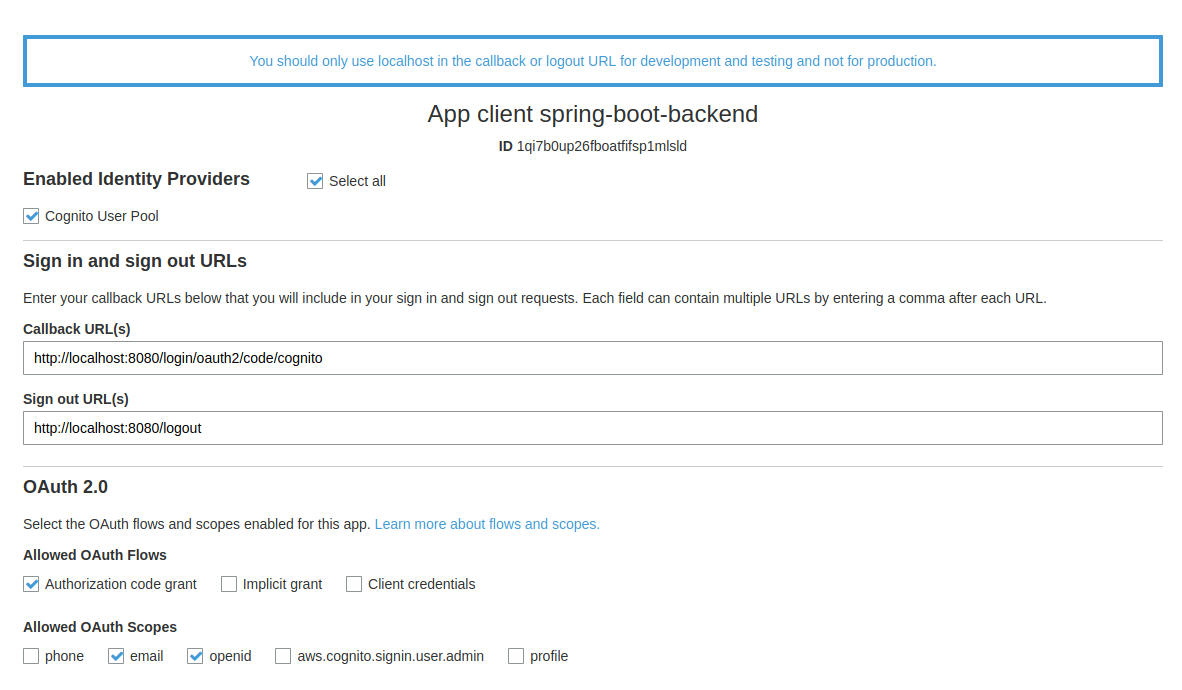
As a next step, we configure the app client settings (left side menu: App Integration -> App Client Settings) as the following
It’s important to add the correct callback URL. With Spring Security the path is /login/oauth2/code/{nameOfTheRegistration}. For local development, the localhost URL is all we need. You can add multiple (e.g your production URL) as a comma-separated list here. Ensure you select Authorization code grant and allow email and openid scope.
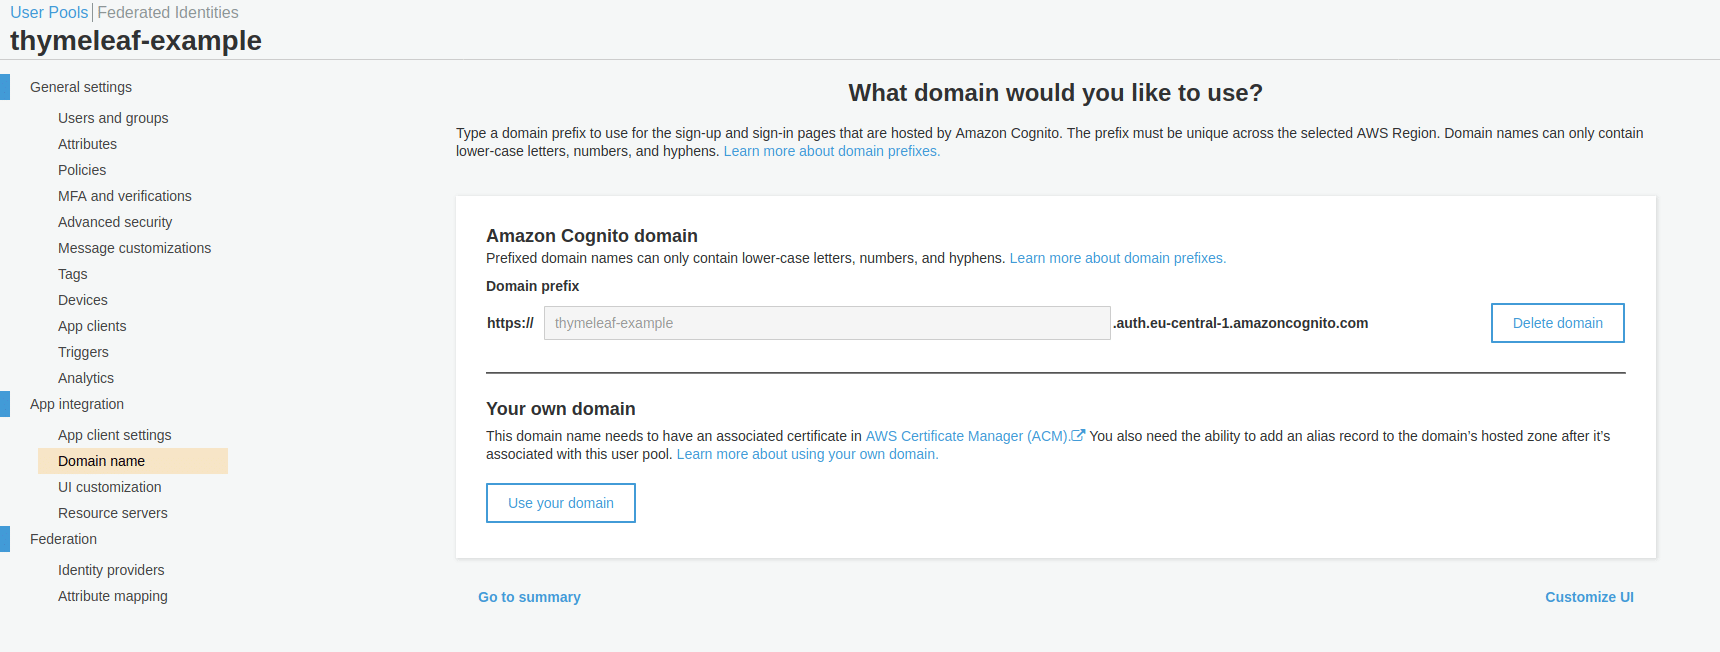
To use the sign-up and login-in page hosted by AWS Cognito, we have to configure a domain name for it (left side menu: App integration -> Domain Name):

As a final step, we can add the first user to our user pool. Go to General Settings -> Users and groups and add one.
To continue with the next section, ensure you have …
- the client id and client secret
- the AWS region you used
- your pool id (you can retrieve this inside General Settings)
… ready and at least one user inside your user pool.
Configuring AWS Cognito as an identity provider
Next comes the Spring Security configuration. Our Spring Boot application acts as an OAuth2 client and Spring Security provides a convenient way to configure this.
Open either your application.yml or application.properties file and add the following section:
|
1 2 3 4 5 6 7 8 9 10 11 12 13 14 15 |
spring: security: oauth2: client: registration: cognito: clientId: ${COGNITO_CLIENT_ID} clientSecret: ${COGNITO_CLIENT_SECRET} scope: openid redirectUriTemplate: http://localhost:8080/login/oauth2/code/cognito clientName: spring-boot-backend provider: cognito: issuerUri: https://cognito-idp.{YOUR_REGION}.amazonaws.com/{YOUR_POOL_ID} userNameAttribute: cognito:username # or just username |
The configuration property spring.security.oauth2.client.registration contains a map of OAuth2 client registrations (there might be multiple for one application). In our example, we give the AWS Cognito registration the name cognito. Hence our callback URL is /login/oauth2/code/cognito.
Besides the configuration for scope, redirectUriTemplate, and clientName, we now need both the clientId and the clientSecret from the previous chapter. I’m using an environment variable to store both values and refer to them using ${NAME_OF_ENV_VARIABLE}.
Inside spring.security.oauth2.client.provider we now add information about the identity provider. The name of the provider has to match the name of the registration. As we are using OpenID Connect, we can add the OpenID Connect discovery endpoint to issuerUri. Make sure to construct the correct URI for your setup by replacing the region and your pool id.
With userNameAttribute we give Spring Security a hint which attribute to use for the username after calling the user info endpoint. Depending on your Cognito setup this is either cognito:username or username.
Next comes the actual security configuration for our application:
|
1 2 3 4 5 6 7 8 9 10 11 12 13 14 15 16 17 |
@Configuration public class WebSecurityConfig extends WebSecurityConfigurerAdapter { @Override protected void configure(HttpSecurity http) throws Exception { http .csrf() .and() .authorizeRequests(authorize -> authorize.mvcMatchers("/").permitAll() .anyRequest().authenticated()) .oauth2Login() .and() .logout() .logoutSuccessUrl("/"); } } |
The configuration above ensures to allow access to our page "/" for everyone, enables CSRF, OAuth2 Login, and configures the application to redirect the user after he logs out to the entry page.
Secure Thymeleaf application with OAuth2 login
Now we are really close to having a working OAuth2 login with Thymeleaf and AWS Cognito using Spring Security.
Three things are missing:
- a login mechanism
- an ability to logout
- securing parts of the application only logged-in users
With the help of thymeleaf-extras-springsecurity5 we get the integration to Spring Security. This allows us to use well-known Spring Security expressions (think hasRole("XYZ") or isAuthenticated()) inside our template.
Let’s take a look at the Thymeleaf template skeleton including the login and logout functionality:
|
1 2 3 4 5 6 7 8 9 10 11 12 13 14 15 16 17 18 19 20 21 22 23 24 25 26 27 28 29 30 31 |
<!DOCTYPE html> <html lang="en" xmlns:sec="http://www.thymeleaf.org/extras/spring-security" xmlns:th="http://www.thymeleaf.org"> <head> <meta charset="utf-8"> <meta content="width=device-width, initial-scale=1" name="viewport"> <title>OAuth2 Login AWS Cognito</title> <!-- CSS & JS for Bootstrap--> </head> <body> <div class="container"> <div> <! -- more to come --> <div sec:authorize="isAnonymous()"> <a class="btn btn-primary" th:href="@{/oauth2/authorization/cognito}" role="button"> Log in with Amazon Cognito </a> </div> <div sec:authorize="isAuthenticated()"> <form method="post" th:action="@{/logout}"> <input type="submit" class="btn btn-danger" value="Logout"/> </form> </div> </div> </div> </body> </html> |
Besides the standard Thymeleaf th namespace, we are including also the sec namespace. We’ll use sec:authorize for our HTML elements to conditionally render them based on Spring Security expressions.
First, we need a way for users to log in to our application. Therefore we can add a link (HTTP GET) to /oauth2/authorization/cognito whenever an anonymous user enters the page. When clicking this link, Spring Security takes care of redirecting the user to AWS Cognito and fetching the access and ID token in the background (when the user enters correct credentials).
Next, we need the logout functionality for users. This should be only available if an authenticated user enters the page. For the logout part, we are using Spring Security’s logout mechanism and make an HTTP POST to /logout.
Furthermore, let’s add more examples for the Thymeleaf and Spring Security integration to conditionally render parts of the page:
|
1 2 3 4 5 6 7 8 9 10 11 12 13 14 15 16 17 |
<div sec:authorize="isAuthenticated()"> <p>Hello, <strong th:text="${#authentication.name}"></strong>!</p> <p>Your authorities are: <strong th:each="authority : ${#authentication.authorities}"><span th:text="${authority.authority} + ' '"></span></strong></p> </div> <div sec:authorize="hasRole('USER')" class="alert alert-primary" role="alert"> This section is only visible only for ROLE_USER. </div> <div sec:authorize="hasRole('ADMIN')" class="alert alert-primary" role="alert"> This section is only visible only for ROLE_ADMIN. </div> <div sec:authorize="isAuthenticated()" class="alert alert-primary" role="alert"> This section is only visible only to authenticated users. </div> |
At the controller level, you can also request authentication information about the user and add different attributes to the Model e.g. based on a role:
|
1 2 3 4 5 6 7 8 9 10 11 12 13 14 15 16 17 18 |
@Controller public class IndexController { @GetMapping public String getIndexPage(Model model, Authentication authentication) { if (authentication != null && authentication.isAuthenticated()) { if (authentication.getAuthorities().stream().anyMatch(a -> a.getAuthority().equals("ADMIN"))) { model.addAttribute("secretMessage", "Admin message is s3crEt"); } else { model.addAttribute("secretMessage", "Lorem ipsum dolor sit amet"); } } model.addAttribute("message", "AWS Cognito with Spring Security"); return "index"; } } |
Testing the OAuth2 protection for Thymeleaf
Most tutorials end here. Let’s go a step further and take a look at how to test this application.
Besides the basic Spring Boot Starter Test, I’m including a dependency to effectively test Spring Boot applications in conjunction with Spring Security:
|
1 2 3 4 5 6 7 8 9 10 11 12 13 14 15 16 |
<dependency> <groupId>org.springframework.boot</groupId> <artifactId>spring-boot-starter-test</artifactId> <scope>test</scope> <exclusions> <exclusion> <groupId>org.junit.vintage</groupId> <artifactId>junit-vintage-engine</artifactId> </exclusion> </exclusions> </dependency> <dependency> <groupId>org.springframework.security</groupId> <artifactId>spring-security-test</artifactId> <scope>test</scope> </dependency> |
With @WebMvcTest we can easily test our MVC controller in isolation. This allows us to write tests without having access to AWS and focus on testing our endpoint.
Using this annotation an auto-configured MockMvc instance is available and by default, our Spring Security configuration is also included.
A first test might verify an anonymous user can access the page (as our Spring Security config allows this) and the MVC model contains the message attribute:
|
1 2 3 4 5 6 7 8 9 10 11 12 13 14 15 16 17 |
@WebMvcTest class IndexControllerTest { @Autowired private MockMvc mockMvc; @Test public void anonymousUsersShouldNotGetSecretMessage() throws Exception { this.mockMvc .perform(get("/") .with(anonymous())) .andExpect(status().isOk()) .andExpect(model().attributeDoesNotExist("secretMessage")) .andExpect(model().attribute("message", "AWS Cognito with Spring Security")); } } |
Further tests can ensure the result for different OIDC login scenarios (e.g. different claims or roles).
For this we can use the oidcLogin() method of the Spring Security test dependency and model different users:
|
1 2 3 4 5 6 7 8 9 10 11 12 13 14 15 16 17 18 19 |
@Test public void authenticatedUsersShouldGetSecretMessage() throws Exception { this.mockMvc .perform(get("/") .with(oidcLogin())) .andExpect(status().isOk()) .andExpect(model().attributeExists("secretMessage", "message")) .andExpect(model().attribute("secretMessage", Matchers.stringContainsInOrder("Lorem ipsum"))); } @Test public void authenticatedAdminUsersShouldGetDetailedSecretMessage() throws Exception { this.mockMvc .perform(get("/") .with(oidcLogin().authorities(new SimpleGrantedAuthority("ROLE_ADMIN")))) .andExpect(status().isOk()) .andExpect(model().attributeExists("secretMessage", "message")) .andExpect(model().attribute("secretMessage", "Admin message is s3crEt")); } |
Summary
We are now at the end of this tutorial. Let’s summarize the required steps to add an OAuth2 Login with AWS Cognito for a Thymeleaf application:
- create a user pool in the AWS console
- create and configure an OAuth2 client for the user pool
- configure the Spring Boot application to act as an OAuth2 client
- secure parts of the Thyemleaf application using the extras dependency for Spring Security
While this tutorial focussed solely on using AWS Cognito, the basic setup works with any OpenID Connect and OAuth2 compliant identity provider. If you use e.g. Keycloak you have to adjust the OAuth2 client registration and provider while the rest of the application works as expected.
UPDATE: There is now the second part of this article available which covers the OIDC logout.
You can find further Spring Boot and AWS related tutorials on my blog and the application for this guide on GitHub.
Have fun securing your Thymeleaf applications with OAuth2 login using AWS Cognito,
Phil

