For securing your enterprise applications you have several choices that require different configuration setups. Lately, the stateless approach is the de-facto standard for securing your microservice-based landscape. With the choice, your applications don’t store session data. The client mostly sends a JWT token with each request and thus the applications access metadata like groups and email. To standardize the authorization workflow, OAuth 2.0 was created. On top of this specification, OpenID Connect offers a layer for clients to identify application users based on the authentication performed by an authorization server. With Keycloak and MicroProfile JWT Auth, we can achieve such authentication and authorization mechanisms with almost no additional code.
Keycloak is an identity-provider which is open source, based on WildFly and developed by RedHat and is used quite often. In enterprise projects, you can even connect Keycloak to an existing LDAP or Active Directory for enterprise user management.
In this blog post, I’ll show you a simple setup for a JWT authentication within a Java EE 8 application with the latest MicroProfile JWT 1.1 spec running on Payara. For the identity and access management, I am using Keycloak (4.8.2.Final) and a React (16.7) based frontend to model a straightforward system architecture. In the end, you will be able to authenticate with your Keycloak user, get visual information about the metadata in the JWT and access a secured JAX-RS resource to obtain a secret message.
Start a Keycloak instance with Docker
The following chapter will explain how to set up the Keycloak server from scratch. You can either follow this step-by-step guide or build an already preconfigured Keycloak server from the Dockerfile I’m providing in my GitHub repository (if you use the preconfigured version, you just have to get the public RSA key from Keycloak admin console and create a sample user).
To start the Keycloak server locally I am using the official jboss/keycloak docker image with the version 4.8.2.Final. For accessing the Keycloak internals you have to pass an admin account and password during the container startup and map the port 8080 to a local port like:
|
1 |
docker run -e KEYCLOAK_USER=admin -e KEYCLOAK_PASSWORD=admin -p 8282:8080 jboss/keycloak:4.8.2.Final |
In this example, I am using my port 8282 so that there won’t be a conflict with Payara later on. After the container successfully started, you can now visit the admin panel in your browser at http://localhost:8282 and use the user and password you passed to the docker container to authenticate.
Setting up Keycloak for JWT
First, we have to set up a new realm, which is a logical container for managing users, credentials, roles, and groups which are then isolated from other realms. At default, only the Master realm exists and to add a new one, you have to create a new in the admin panel at the top left (while hovering over the drop-down indicator):

On the following page add the name MicroProfile and make sure the realm is enabled. Next, go to the Keys tab within the Realm Settings and copy the public key of the rsa-generated key to an editor or clipboard. We will need this key later on for verifying the JWT signature within the Java EE backend.
To provide groups for the user, you have to first create some groups. Go to Manage -> Groups -> and click on New to add a group. Enter a group name e.g. ADMIN or USER and press Save. That’s all for adding a group.
As we won’t connect an Active Directory or LDAP, we have to set up at least one user manual. Go to Users (left-side menu) and click Add User. Enter a username and hit save. To add a password, go to the Credentials tab within the user and enter a password of your choice:

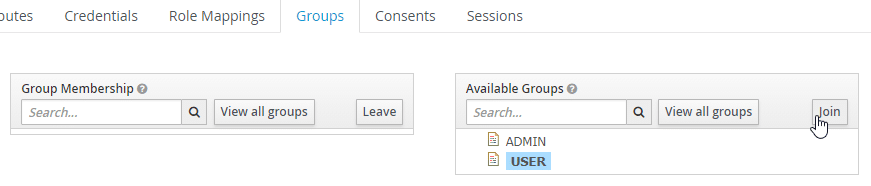
Within the user settings, you can switch to the tab Groups and select an available group and hit Join to add this user to the group.
Add the React frontend as a client inside Keylcoak
Our frontend will, later on, manage the authentication with Keycloak. Therefore we have to make sure that Keycloak is aware of this application. Therefore Keycloak offers the concept of a client, which is an entity that can request Keycloak to authenticate a user. A new client can be added in the Clients section (left-side menu) in the admin panel within our realm. Click on Add Client and enter the client id react-webapp. Next, select openid-connect as the protocol and http://localhost:3000 as the root URL:

As Keycloak per default won’t add the users’ group information to the JWT, we have to configure this. Within the client settings for react-webapp, go to the tab Mappers and create a new one. Select Group Membership as Mapper Type, enter group as Name and groups as Token Claim Name. Make sure to disable the Full group path switch. Otherwise we get a slash in front of the group name (e.g. /USER):

To configure the frontend for the Keycloak authentication we need the Keycloak OIDC JSON. We can obtain this at the tab Installation within our client.
The JSON should look like the following:
|
1 2 3 4 5 6 7 8 |
{ "realm": "MicroProfile", "auth-server-url": "http://localhost:8282/auth", "ssl-required": "external", "resource": "react-webapp", "public-client": true, "confidential-port": 0 } |
That’s all for the Keycloak configuration. All your configured groups, roles and clients can be exported within the Export menu section.
Setting up the frontend with React
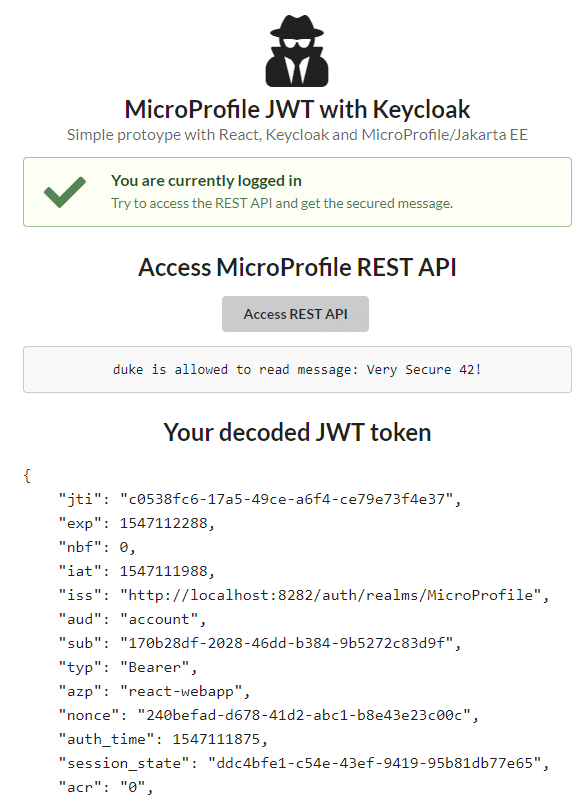
Within this chapter I’ll show you the required steps to integrate Keycloak within React to produce the following application:
To bootstrap a simple React app I’ve used the create-react-app CLI. In addition, I’ve added semantic-ui-react, axios, and the keycloak-js dependency:
|
1 2 3 4 5 6 7 8 9 10 11 12 13 14 15 |
{ "name": "frontend", "version": "0.1.0", "private": true, "dependencies": { "axios": "^0.18.0", "keycloak-js": "^4.8.1", "react": "^16.7.0", "react-dom": "^16.7.0", "react-scripts": "2.1.2", "semantic-ui-css": "^2.4.1", "semantic-ui-react": "^0.84.0" }, ... } |
I’m using just the generated App component and perform the authentication with Keycloak when the component did mount:
|
1 2 3 4 5 6 7 8 9 |
componentDidMount = () => { const keycloak = Keycloak("/keycloak.json"); keycloak.init({ onLoad: 'login-required' }).success(authenticated => { this.setState({ keycloak: keycloak, authenticated: authenticated }); }).error(err => { alert(err); }); } |
The required keycloak.json can be placed within the public folder and is the Keycloak OIDC JSON you get from the Keycloak admin interface (one of the last steps within setting up Keycloak). The init function will check if the user is already authenticated and if not, will redirect to the Keycloak authentication page:

The user can now enter this username and his credentials to authenticate. After he got successfully authenticated, Keycloak will redirect the user to the React app. The authentication status is then stored within the state of the App component.
In addition, I am decoding the public part of the JWT as this is just a Base64 encoded string.
Therefore I am using the following function:
|
1 2 3 4 5 |
decodeJWT = (token) => { var base64Url = token.split('.')[1]; var base64 = base64Url.replace('-', '+').replace('_', '/'); return JSON.stringify(JSON.parse(window.atob(base64)), null, 4); } |
For accessing the secured JAX-RS endpoint, the JWT token has to be attached to the HTTP Authorization header.
With axios as HTTP client this is pretty straightforward:
|
1 2 3 4 |
fetchBackendData = () => { axios.get('http://localhost:8080/resources/secure', { headers: { 'Authorization': ' Bearer ' + this.state.keycloak.token } }) .then(res => this.setState({ backendData: res.data })); } |
You can find the whole JSX/HTML of the App component on GitHub.
Setting up the backend with MicroProfile JWT Auth
The backend application has to verify the integrity of the passed JWT token. Next, it maps the JWT claims to a Java object and the available groups to Java EE roles if the JWT is valid. The MicroProfile JWT spec manages all of this. The specification defines a set of JWT claims which have to be present and describes how perform the authentication. You can get further information in the official spec document.
To bootstrap the Java EE 8 and Microprofile 2.0.1 application, I’m using my own Maven archetype which produces the following pom.xml:
|
1 2 3 4 5 6 7 8 9 10 11 12 13 14 15 16 17 18 19 20 21 22 23 24 25 26 27 28 29 30 31 32 33 34 35 36 37 38 39 40 41 42 43 44 45 46 |
<project xmlns="http://maven.apache.org/POM/4.0.0" xmlns:xsi="http://www.w3.org/2001/XMLSchema-instance" xsi:schemaLocation="http://maven.apache.org/POM/4.0.0 http://maven.apache.org/xsd/maven-4.0.0.xsd"> <modelVersion>4.0.0</modelVersion> <groupId>de.rieckpil.learning</groupId> <artifactId>microprofile-jwt-keycloak-auth</artifactId> <version>1.0-SNAPSHOT</version> <packaging>war</packaging> <dependencies> <dependency> <groupId>javax</groupId> <artifactId>javaee-api</artifactId> <version>8.0</version> <scope>provided</scope> </dependency> <dependency> <groupId>org.eclipse.microprofile</groupId> <artifactId>microprofile</artifactId> <version>2.0.1</version> <type>pom</type> <scope>provided</scope> </dependency> <dependency> <groupId>junit</groupId> <artifactId>junit</artifactId> <version>4.12</version> <scope>test</scope> </dependency> <dependency> <groupId>org.mockito</groupId> <artifactId>mockito-core</artifactId> <version>2.23.0</version> <scope>test</scope> </dependency> </dependencies> <build> <finalName>microprofile-jwt-keycloak-auth</finalName> </build> <properties> <maven.compiler.source>1.8</maven.compiler.source> <maven.compiler.target>1.8</maven.compiler.target> <failOnMissingWebXml>false</failOnMissingWebXml> <project.build.sourceEncoding>UTF-8</project.build.sourceEncoding> <project.reporting.outputEncoding>UTF-8</project.reporting.outputEncoding> </properties> </project> |
As the frontend request comes from a different origin, I’ve added a simple CORS JAX-RS filter:
|
1 2 3 4 5 6 7 8 9 10 11 12 13 14 15 16 17 18 19 |
import java.io.IOException; import javax.ws.rs.container.ContainerRequestContext; import javax.ws.rs.container.ContainerResponseContext; import javax.ws.rs.container.ContainerResponseFilter; import javax.ws.rs.ext.Provider; @Provider public class CorsFilter implements ContainerResponseFilter { @Override public void filter(ContainerRequestContext requestContext, ContainerResponseContext responseContext) throws IOException { responseContext.getHeaders().add("Access-Control-Allow-Origin", "*"); responseContext.getHeaders().add("Access-Control-Allow-Credentials", "true"); responseContext.getHeaders().add("Access-Control-Allow-Headers", "origin, content-type, accept, authorization"); responseContext.getHeaders().add("Access-Control-Allow-Methods", "GET, POST, PUT, DELETE, OPTIONS, HEAD"); } } |
The JAX-RS application configuration is pretty straightforward:
|
1 2 3 4 5 |
@LoginConfig(authMethod = "MP-JWT") @ApplicationPath("resources") @DeclareRoles({"USER", "ADMIN"}) public class JAXRSConfiguration extends Application { } |
The @LoginConfig(authMethod = "MP-JWT") is required to enable the MP-JWT authentication mechanism within the application server. In addition, I’m defining the available roles with the declarative annotation, which could also be part of the web.xml file.
Access the JWT inside a JAX-RS resource
Within the JAX-RS resource I’m providing a simple endpoint which is accessible for users within the USER group:
|
1 2 3 4 5 6 7 8 9 10 11 12 13 14 15 16 17 18 19 20 21 22 23 24 25 26 27 28 29 30 31 32 |
import javax.annotation.security.RolesAllowed; import javax.ejb.Stateless; import javax.inject.Inject; import javax.ws.rs.GET; import javax.ws.rs.Path; import javax.ws.rs.core.Response; import org.eclipse.microprofile.config.inject.ConfigProperty; import org.eclipse.microprofile.jwt.JsonWebToken; @Path("secure") @Stateless public class VerySecureResource { @Inject @ConfigProperty(name = "message") private String message; @Inject private JsonWebToken callerPrincipal; @GET @RolesAllowed("USER") public Response message() { System.out.println(callerPrincipal.getIssuer()); System.out.println(callerPrincipal.getRawToken()); System.out.println(callerPrincipal.getTokenID()); return Response.ok(callerPrincipal.getName() + " is allowed to read message: " + message).build(); } } |
The JsonWebToken interface is part of the MicroProfile JWT spec and holds all the JWT claims and is compatible with the JSR 375 caller Principal.
For the JWT verification, you have to configure at least the name of the issuer and the public key of the RSA signature. The specification defines several configurations. I am using the microprofile-config.properties file within src/main/resources/META-INF:
|
1 2 3 |
message=Very Secure 42! mp.jwt.verify.publickey.location=/META-INF/orange.pem mp.jwt.verify.issuer=http://localhost:8282/auth/realms/MicroProfile |
And store the public key in the configured location like:
|
1 2 3 |
-----BEGIN PUBLIC KEY----- YOUR PUBLIC KEY HERE. CAN BE OBTAINED FROM THE KEYCLOAK ADMIN INTERFACE -----END PUBLIC KEY----- |
With this configuration, we can now deploy the Java EE application to Payara. If you are using my Maven archetype you can deploy the application and start Payara as a Docker container with the buildAndRun batch or bash script.
You can find the whole codebase on GitHub and try it out locally.
Have fun securing your applications with MicroProfile JWT Auth and Keycloak,
Phil
