As my last blog post about a short intro to JavaServer Faces 2.3 got a lot of attention (my tweet got even retweeted by the Java EE Guardian’s twitter page (@javaee_guardian) I want to continue to write about JSF. This time about CRUD applications with JSF and PrimeFaces.
A developer previously working with JavaScript web frameworks writes about what he is seeing in JSF. Definitely worth a read. https://t.co/c6gXvjgdmZ // @rieckpil pic.twitter.com/w1pvL5IpAT
— Java EE Guardians (@javaee_guardian) August 1, 2018
Today I’ll cover one of the most common use cases for developing web-based applications: displaying/inserting/updating/deleting data in a simple table. Doing this with a JavaScript Single Page Application would lead to writing a lot of code for validation, AJAX data transfer, data manipulation, and correct error handling. On the server-side, you’ll probably offer a REST API for this use case and use a database for persistent storage. With Java EE a lot of these tasks are already defined in a specification and we just have to make use of them.
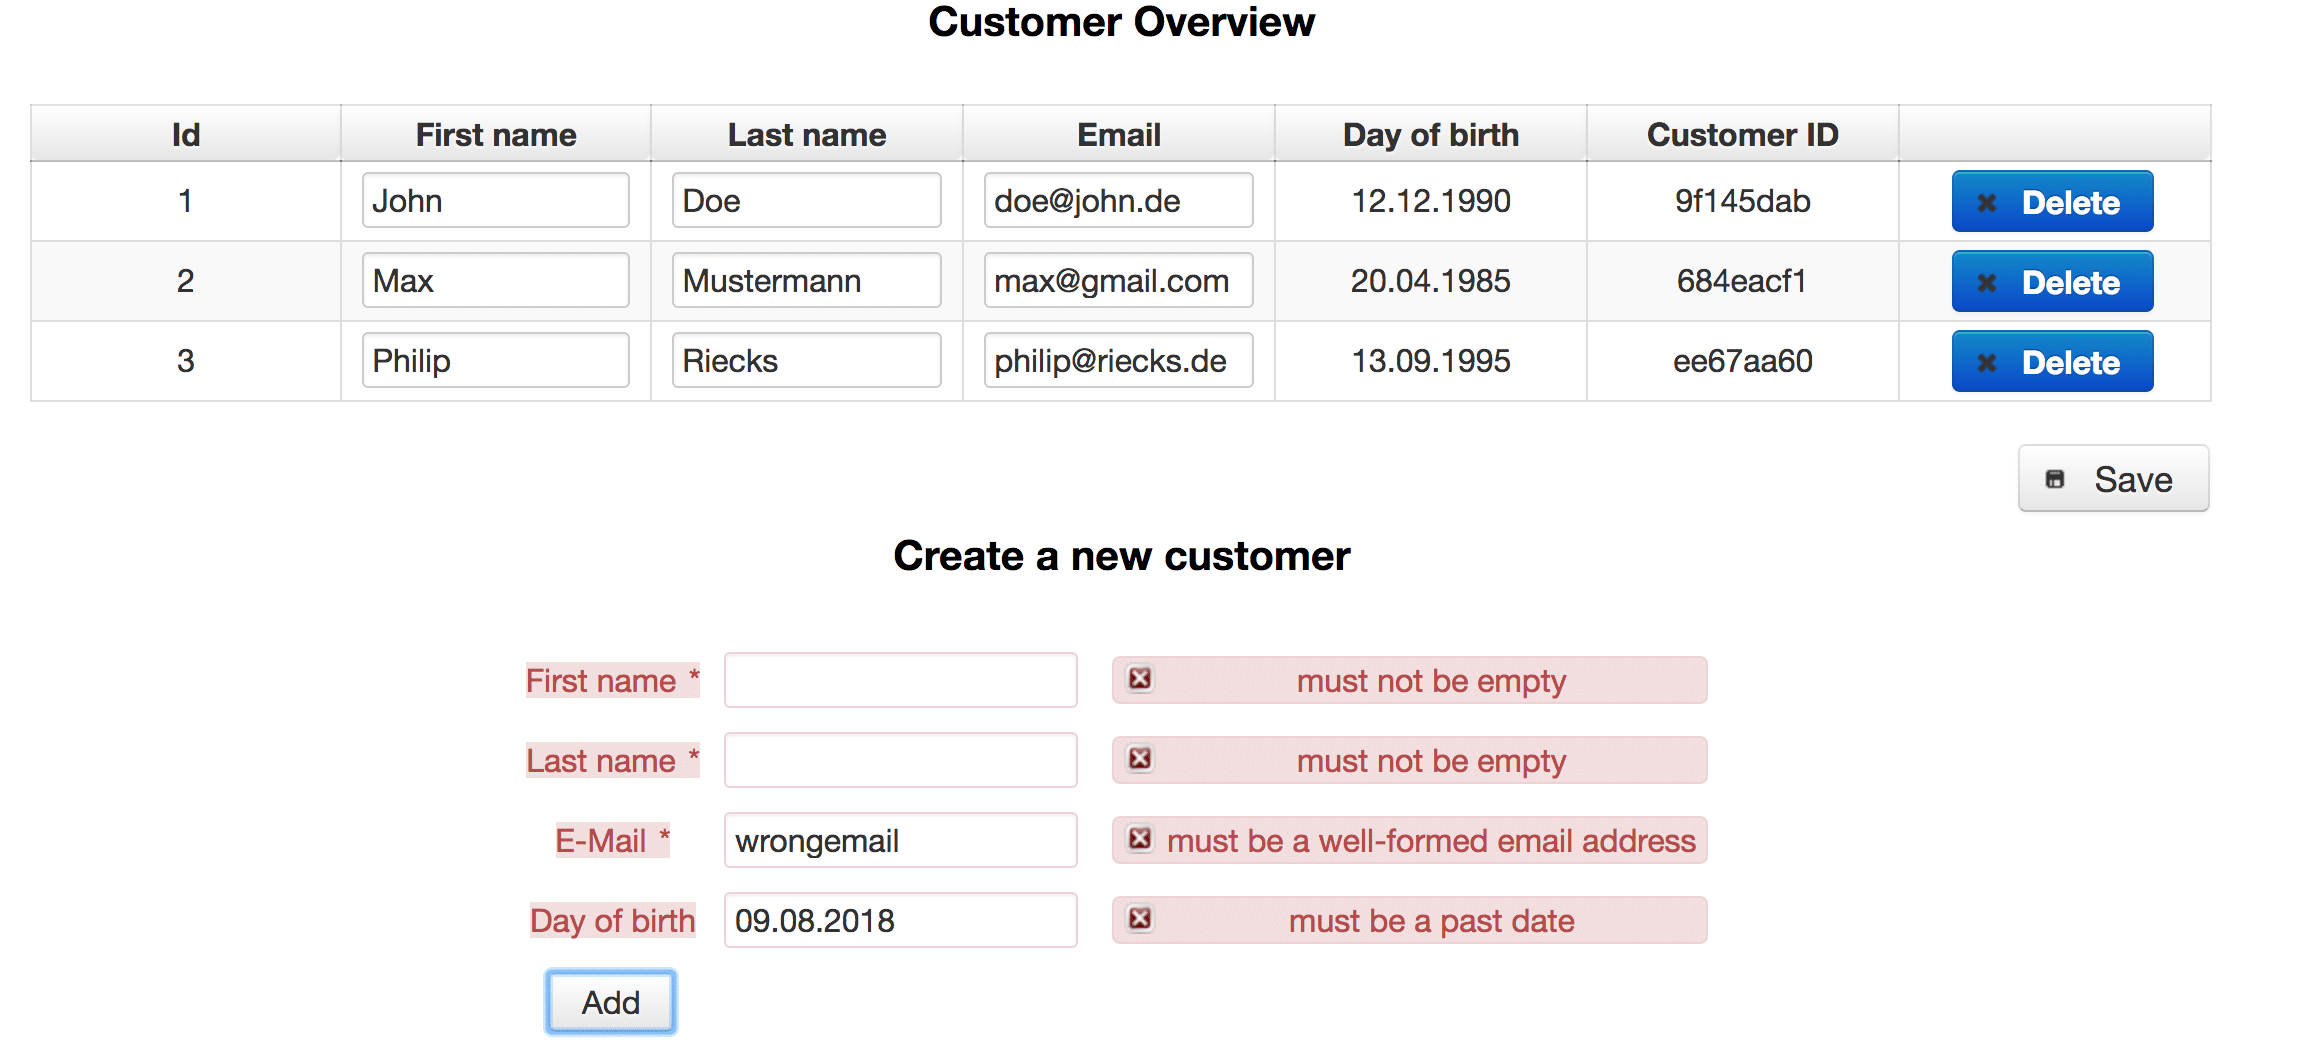
Let’s see how we can make the most of JSF, Bean Validation, JPA for this use case. For a short example, I pretend we are building a small CRM web-based application to manage our customers. I’ll use Java EE 8, enhance the JSF 2.3 page with PrimeFaces 8.0, deploy it to a Payara 5.201 as a docker container and use Payara’s default in-memory database H2. The final page will look like the following:

JSF project setup using PrimeFaces
Starting with the pom.xml there are some changes compared to the JSF ‘Hello World’ example:
|
1 2 3 4 5 6 7 8 9 10 11 12 13 14 15 16 17 18 19 20 21 22 23 24 25 26 27 28 29 30 31 32 33 34 35 36 37 38 39 40 41 42 43 44 45 46 47 48 49 |
<?xml version="1.0" encoding="UTF-8"?> <project xmlns="http://maven.apache.org/POM/4.0.0" xmlns:xsi="http://www.w3.org/2001/XMLSchema-instance" xsi:schemaLocation="http://maven.apache.org/POM/4.0.0 http://maven.apache.org/xsd/maven-4.0.0.xsd"> <modelVersion>4.0.0</modelVersion> <groupId>de.rieckpil.blog</groupId> <artifactId>simple-crud-table-with-jsf-and-primefaces</artifactId> <version>1.0-SNAPSHOT</version> <packaging>war</packaging> <properties> <project.build.sourceEncoding>UTF-8</project.build.sourceEncoding> <project.reporting.outputEncoding>UTF-8</project.reporting.outputEncoding> <maven.compiler.source>1.8</maven.compiler.source> <maven.compiler.target>1.8</maven.compiler.target> <failOnMissingWebXml>false</failOnMissingWebXml> </properties> <repositories> <repository> <id>prime-repo</id> <name>Prime Repo</name> <url>http://repository.primefaces.org</url> </repository> </repositories> <dependencies> <dependency> <groupId>javax</groupId> <artifactId>javaee-api</artifactId> <version>8.0</version> </dependency> <dependency> <groupId>org.primefaces</groupId> <artifactId>primefaces</artifactId> <version>8.0</version> </dependency> <dependency> <groupId>org.primefaces.themes</groupId> <artifactId>all-themes</artifactId> <version>1.0.10</version> </dependency> </dependencies> <build> <finalName>crud-table-jsf-primefaces</finalName> </build> </project> |
For more convenient JSF elements I am using the PrimeFaces library and their ‘all-theme’ library for changing the default theme later on. In addition, you need to explicitly declare the PrimeFaces repository to be able to get those themes. To be able to store the JPA entities in the H2 in-memory, I configured the persistence.xml in src/main/resources/META-INF like the following:
|
1 2 3 4 5 6 7 8 9 10 |
<?xml version="1.0" encoding="UTF-8"?> <persistence version="2.2" xmlns="http://xmlns.jcp.org/xml/ns/persistence" xmlns:xsi="http://www.w3.org/2001/XMLSchema-instance" xsi:schemaLocation="http://xmlns.jcp.org/xml/ns/persistence http://xmlns.jcp.org/xml/ns/persistence/persistence_2_2.xsd"> <persistence-unit name="prod" transaction-type="JTA"> <properties> <property name="javax.persistence.schema-generation.database.action" value="drop-and-create"/> </properties> </persistence-unit> </persistence> |
The web.xml looks like the following:
|
1 2 3 4 5 6 7 8 9 10 11 12 13 14 15 16 17 18 19 20 21 22 23 24 25 |
<?xml version="1.0" encoding="UTF-8"?> <web-app version="4.0" xmlns="http://xmlns.jcp.org/xml/ns/javaee" xmlns:xsi="http://www.w3.org/2001/XMLSchema-instance" xsi:schemaLocation="http://xmlns.jcp.org/xml/ns/javaee http://xmlns.jcp.org/xml/ns/javaee/web-app_4_0.xsd"> <context-param> <param-name>primefaces.THEME</param-name> <param-value>bootstrap</param-value> </context-param> <servlet> <servlet-name>Faces Servlet</servlet-name> <servlet-class>javax.faces.webapp.FacesServlet</servlet-class> <load-on-startup>1</load-on-startup> </servlet> <servlet-mapping> <servlet-name>Faces Servlet</servlet-name> <url-pattern>*.xhtml</url-pattern> </servlet-mapping> <welcome-file-list> <welcome-file>customers.xhtml</welcome-file> </welcome-file-list> </web-app> |
Here I am specifying the PrimeFaces bootstrap theme and the servlet mapping for the views. In this example, I’ll just write one view (customers.xhtml) which should be loaded as the central welcome file.
Writing the CRUD application with JSF
The central Customer JPA entity is modeled as the following:
|
1 2 3 4 5 6 7 8 9 10 11 12 13 14 15 16 17 18 19 20 21 22 23 24 25 26 |
@Entity public class Customer { @Id @GeneratedValue(strategy = GenerationType.IDENTITY) private Long id; @Column(nullable = false) @NotEmpty private String firstName; @Column(nullable = false) @NotEmpty private String lastName; @Column(nullable = false) @NotEmpty @Email private String email; @Past private LocalDate dayOfBirth; // constructors and getters & setters } |
In this example, I am mixing both JPA annotations and bean validation annotations, which is ok for this small showcase but for bigger projects, I would suggest using some kind of transfer object which got the bean validation annotations and is mapped to the JPA entity within a service. The bean validation annotations (@NotEmpty, @Email,@Past) are quite important as they will help us later on with the validation of the user input.
These declarative annotations need no implementation from our side as the application server provides a reference implementation on runtime. Another cool feature which comes with bean validation and the PrimeFaces input component is that all the required input fields (e.g. @NotEmptyor @NotNull) are marked with a black asterisk ‘*’ out of the box.
For the interaction with the EntityManager, I created a simple stateless EJB that is responsible for the CRUD (create, read, update and delete) operations. The code should be quite straightforward and I don’t want to get in detail here:
|
1 2 3 4 5 6 7 8 9 10 11 12 13 14 15 16 17 18 19 20 21 22 23 24 25 26 27 28 29 30 31 32 33 34 35 36 37 |
@Stateless public class CustomerManager { @PersistenceContext private EntityManager entityManager; public List<Customer> loadAllCustomers() { return this.entityManager.createQuery("SELECT c FROM Customer c", Customer.class).getResultList(); } public void delete(Customer customer) { if (entityManager.contains(customer)) { entityManager.remove(customer); } else { Customer managedCustomer = entityManager.find(Customer.class, customer.getId()); if (managedCustomer != null) { entityManager.remove(managedCustomer); } } } public void addNewCustomer(Customer customer) { Customer newCustomer = new Customer(); newCustomer.setDayOfBirth(customer.getDayOfBirth()); newCustomer.setEmail(customer.getEmail()); newCustomer.setFirstName(customer.getFirstName()); newCustomer.setLastName(customer.getLastName()); newCustomer.setCustomerId(UUID.randomUUID().toString().substring(0, 8)); this.entityManager.persist(newCustomer); } public void update(List<Customer> customers) { customers.forEach(entityManager::merge); } } |
The corresponding backing bean for the JSF view is also quite simple and it more or less just delegates the operations to the injected EJB.
|
1 2 3 4 5 6 7 8 9 10 11 12 13 14 15 16 17 18 19 20 21 22 23 24 25 26 27 28 29 30 31 32 33 34 |
@Named @ViewScoped public class CustomersBacking implements Serializable { private List<Customer> customers; private Customer customer = new Customer(); @Inject private CustomerManager customerManager; @PostConstruct public void init() { this.customers = customerManager.loadAllCustomers(); } public void delete(Customer customer) { customerManager.delete(customer); customers.remove(customer); } public void add() { customerManager.addNewCustomer(customer); this.customers = customerManager.loadAllCustomers(); this.customer = new Customer(); } public void update() { customerManager.update(customers); FacesContext.getCurrentInstance().addMessage(null, new FacesMessage("Update successful")); } // getters & setters } |
All available customers are stored in a list within @PostConstruct. The additional field customer is required for storing the current inputs of the end-user in the Customer object. When a new customer is stored in the database in the add() method, the reference will be overridden to get empty input fields in the view.
The update() method is responsible for updating all available customers as I don’t provide an update mechanism on each customer object. That’s everything on the backend side for our simple use case. Let’s continue with the view. I’ll split the explanation of the view into two parts, one for the data table and the other for the form for creating a new customer.
Create the JSF views
The data table is wrapped into a simple HTML form to be able to fire some action within a <p:commandButton> element.
|
1 2 3 4 5 6 7 8 9 10 11 12 13 14 15 16 17 18 19 20 21 22 23 24 25 26 27 28 29 30 31 32 33 34 35 36 37 38 39 40 41 42 |
<h:form id="customers"> <p:growl id="growl" sticky="true" /> <p:dataTable id="customerList" var="customer" value="#{customersBacking.customers}"> <p:column headerText="Id"> <h:outputText value="#{customer.id}"/> </p:column> <p:column headerText="First name"> <p:inputText id="firstNameInput" value="#{customer.firstName}"/> </p:column> <p:column headerText="Last name"> <p:inputText id="lastNameInput" value="#{customer.lastName}"/> </p:column> <p:column headerText="Email"> <p:inputText id="emailInput" value="#{customer.email}"/> </p:column> <p:column headerText="Day of birth"> <h:outputText value="#{customer.dayOfBirth}"> <f:convertDateTime type="localDate" pattern="dd.MM.yyyy"/> </h:outputText> </p:column> <p:column headerText="Customer ID"> <h:outputText value="#{customer.customerId}"/> </p:column> <p:column> <p:commandButton update="customerList" value="Delete" icon="ui-icon-closethick" action="#{customersBacking.delete(customer)}" styleClass="ui-priority-primary"> </p:commandButton> </p:column> </p:dataTable> <br/> <p:commandButton style="float: right" id="save" value="Save" tyleClass="ui-priority-primary" action="#{customersBacking.update}" icon="ui-icon-disk" update="growl"> <f:ajax execute="@form" render="@form"/> </p:commandButton> </h:form> |
The <p:…> namespace is referencing the PrimeFaces components, which is declared at the top of the .xhtml file:
|
1 2 3 4 |
<html xmlns="http://www.w3.org/1999/xhtml" xmlns:h="http://xmlns.jcp.org/jsf/html" xmlns:f="http://xmlns.jcp.org/jsf/core" xmlns:p="http://primefaces.org/ui"> |
On top of the <p:dataTable> I am declaring a growl element which is PrimeFaces component for displaying messages which are published in the current FacesContext. The data table is using the list of customers of the backing bean for its data source and will display a row for every customer on the list.
In addition to just displaying the data, I added a <p:inputText> elements for attributes that should be updatable like the first name, last name and the email of the customer. The other fields are just read-only. For the conversion of the day of birth of the customer, I am using the <f:convertDateTime> helper element.
Every table row also gets an extra column with a delete command button to delete the selected row. The customer which should be deleted is passed to the backing bean’s delete(Customer customer) method. At default, the PrimeFaces command buttons perform an AJAX request and you can specify the element which should be updated after the AJAX call in the update attribute of the <p:commandButton> element.
The last command button is responsible for saving the changes made to several customers and will update the growl element for the new Faces Message. The HTML part of creating a new customer is also quite simple:
|
1 2 3 4 5 6 7 8 9 10 11 12 13 14 15 16 17 18 19 20 21 22 23 24 25 26 |
<h:form id="add"> <h:panelGrid columns="3" cellpadding="5" style="margin: 0 auto;"> <p:outputLabel for="firstName" value="First name" /> <p:inputText id="firstName" value="#{customersBacking.customer.firstName}" /> <p:message for="firstName" /> <p:outputLabel for="lastName" value="Last name" /> <p:inputText id="lastName" value="#{customersBacking.customer.lastName}"> </p:inputText> <p:message for="lastName" /> <p:outputLabel for="email" value="E-Mail" /> <p:inputText id="email" value="#{customersBacking.customer.email}"> </p:inputText> <p:message for="email" /> <p:outputLabel for="dayOfBirth" value="Day of birth" /> <p:calendar id="dayOfBirth" value="#{customersBacking.customer.dayOfBirth}" pattern="dd.MM.yyyy" mask="true"> <f:convertDateTime type="localDate" pattern="dd.MM.yyyy" /> </p:calendar> <p:message for="dayOfBirth" /> <p:commandButton update="@form :customers:customerList" value="Add" action="#{customersBacking.add}"> </p:commandButton> </h:panelGrid> </h:form> |
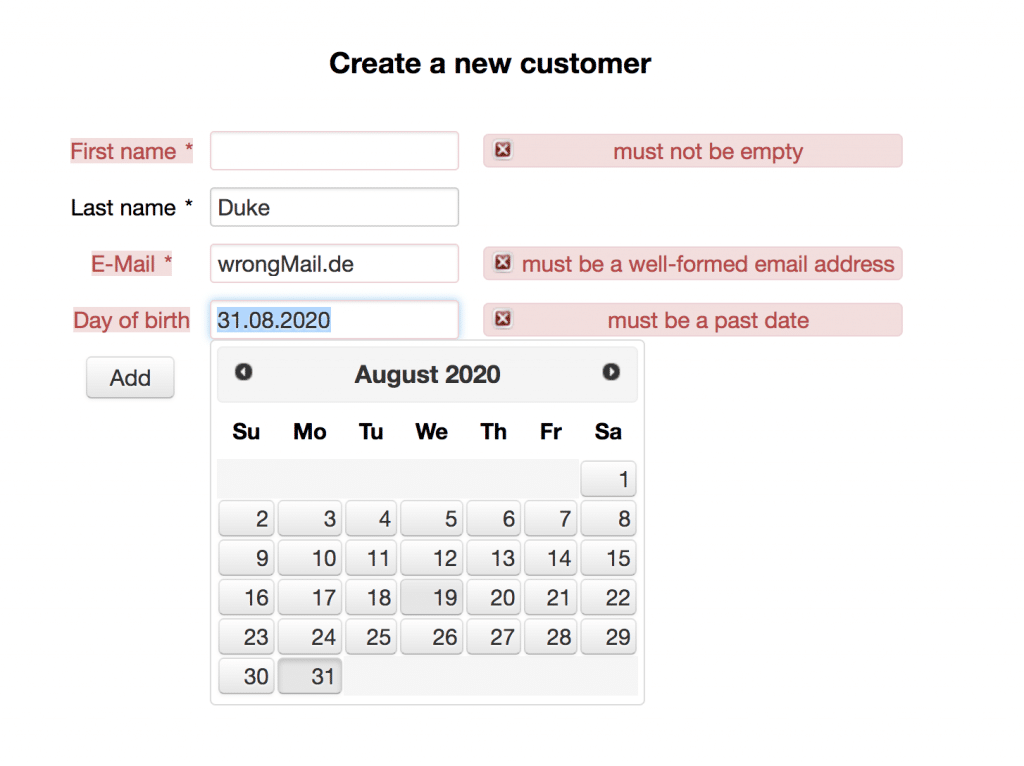
For every attribute which is modifiable, I am providing an outputLabel, inputText and message component. For the day of birth, I added a simple PrimeFaces calendar component which will also provide a mask for the required date format. When the user inserts data and tries to create a new user, the input data will be validated according to the Bean Validation annotations at the Customer entity. A missing first name, a wrongly formatted email or a day of birth in the future will be detected and an error message will be displayed: 
Writing this application with a SPA and a backend of your choice would take quite more time and you would produce more code. Try this example for yourself or have a look at my GitHub repository for the full codebase and a step-by-step tutorial to get this running on your machine in the README.md of the project.
There is quite more to discover with JSF 2.3 and Java EE in general (e.g. WebSockets, Internationalization, Security …), so stay tuned for the next blog posts. To start with JSF 2.3 I can recommend The Definitive Guide to JSF in Java EE 8 from Bauke Scholtz (@OmniFaces) & Arjan Tijms (@arjan_tijms).
Have fun writing CRUD applications with JSF and PrimeFaces,
Phil

